
Yumi Making Re-Examined
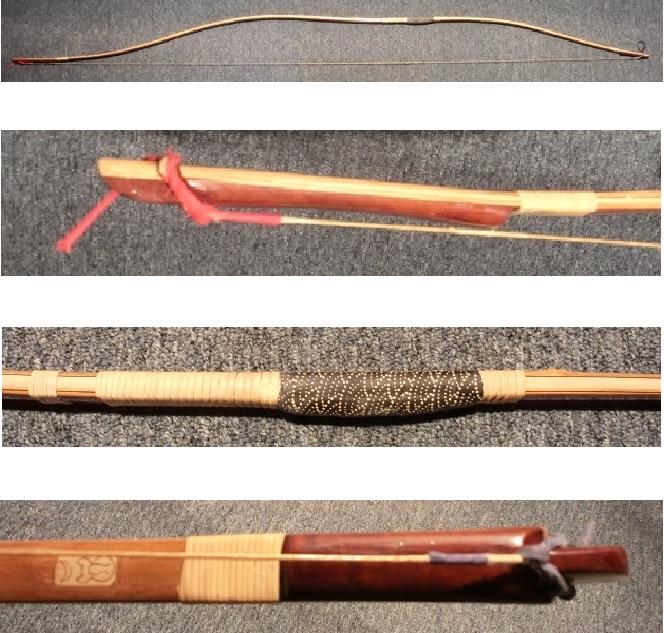
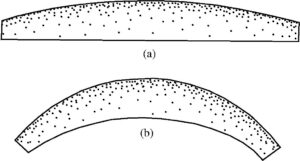
The photographs of Fig. 1 document an outcome of the yumi making process we describe here. The materials and design are mostly traditional. The main departure from tradition is the presence of 14 mill = 0.014″ carbon laminations beneath the back and belly bamboo skins. They appear as the black lines in the third panel. They are an essential reason for re-examining the yumi making process. In the traditional process, the Urazori height right after lamination is typically much greater than the final 15-20 cm. The final Urazori shape is gradually approached by many sessions of heat aided bending. The initial lamination with carbon strips under the bamboo skins has very little malleability. Hence, the lamination process must produce the correct Urazori shape at the outset.
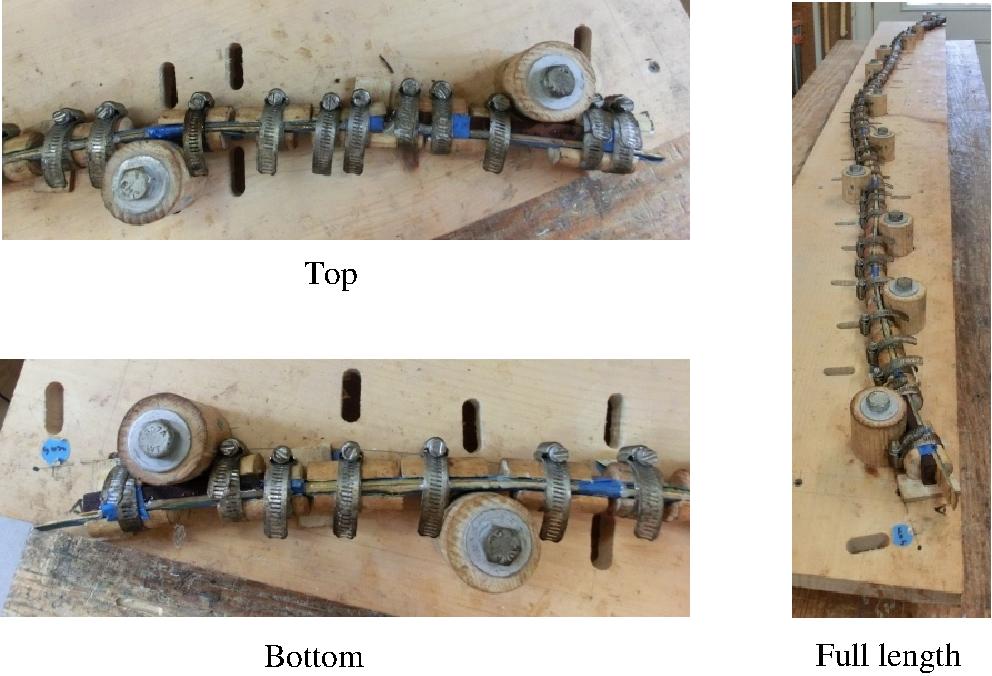
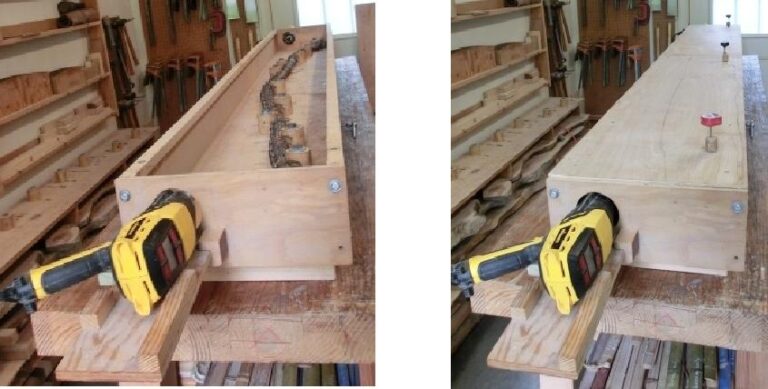
Not surprisingly, it is the layup that radically departs from tradition. Instead of the ropes and splints pictured in Fig. 3 of the article “Aesthetics, Geometry and the Yumi,” the layup happens on the spline table depicted in Fig. 2. Clamping is achieved by an assembly of half cylinders and plumber’s band clamps, also evident in Fig. 2. We return to details in due course.
For completeness, we describe the whole process, both in its debt to and departure from tradition.
The bamboo grove
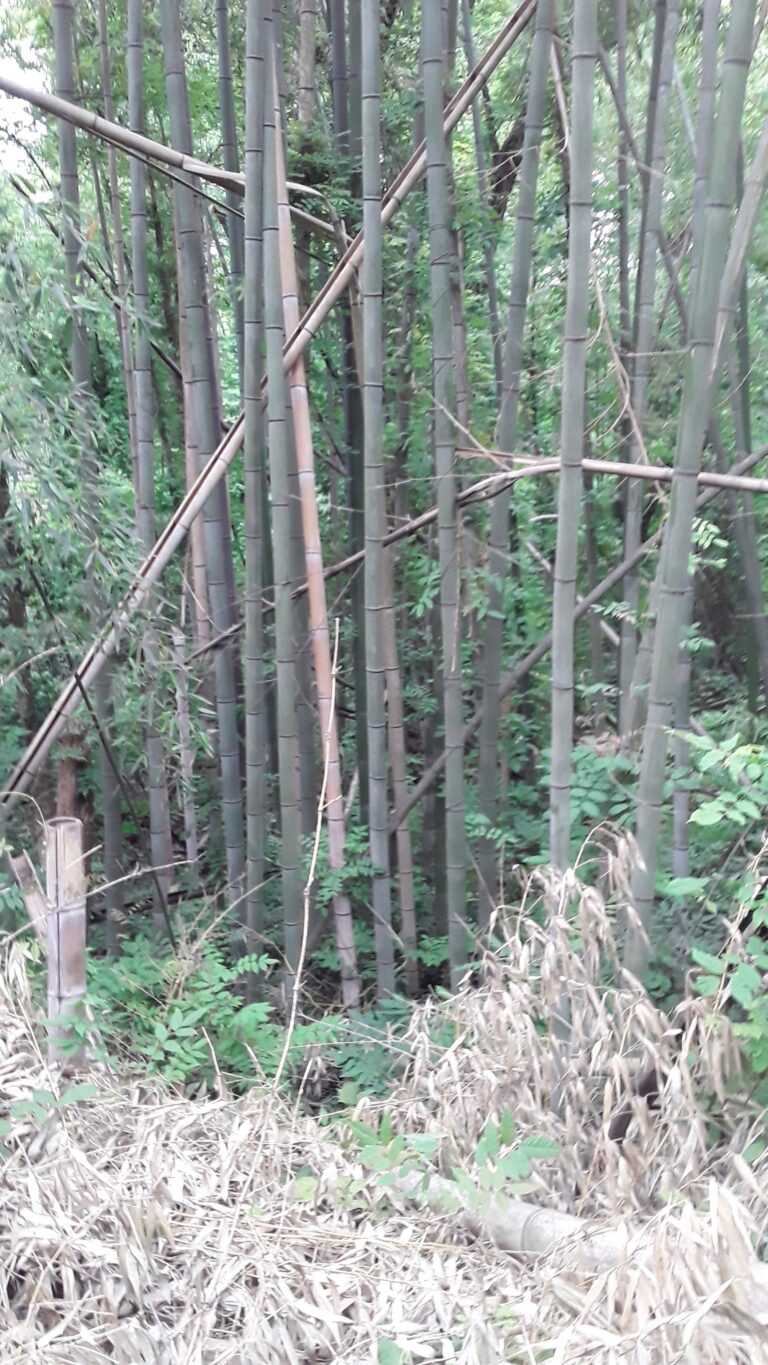
Figure 3 shows an “entrance” into a bamboo grove in Durham NC where my culms are harvested. It is as thorny and brambly as it looks. Traditionally, harvesting happens in winter. I’ve harvested in late fall or early spring as well. Summer is hot, humid and buggy.
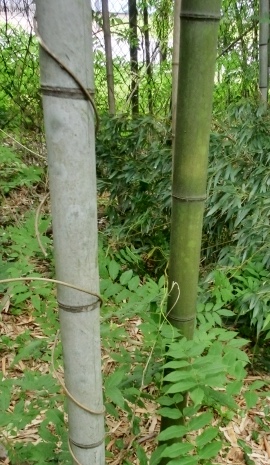
In Fig. 4, the bright green culm to the right is young growth. Through attractive looking and unblemished, it is not what we are looking for. The culm to the left is old growth. Old growth culms have a faded grey-green surface, often with blemishes. They are harder and denser and more elastic than young growth. In addition, they have much better dimensional integrity under air drying and tempering.
The most exacting requirement of initial culm selection is related to nodal spacing. I have thin furring strips marked with white dots indicating nodal spacings for Namisun, Nissun, Yonson and Rokusun yumi. Figure 5 shows a culm which nicely matches the spacing of dots on the “Nissun” strip. The fussier you are about nodal spacings, the longer time you will spend in the bamboo grove.

Once a culm is selected, the first job is to cut a roughly 300 cm length near its base free of branches and leaf nodes. The extra length gives flexibility in mating back and belly laminations with the nodes correctly positioned relative to each other.
Splitting, drying and heating of bamboo laminations
The culms are split into strips somewhat wider than yumi immediately after harvesting. A traditional splitter consists of two wedges that cross at right angles. Culms typically have some bend, so the splitter has to be oriented so as to obtain two sections which can be laid out flat. The other two, which cannot, are cut into narrower strips for the yumi core.
My process begins by securing the ends of the culm with blocks and clamps so its center axis traces an arch in a vertical plane. A 1 1/2″ wide strip of masking tape straddles the ridge of the culm, marking one strip for a yumi lamination. Lengthwise cuts following the edges of the masking tape are executed with a Japanese pull saw. The cuts accurately trace the intended lines with pull strokes of minimal force. After the cuts are done, the strip marked by masking tape remains lightly secured to the culm by internal walls which span cross sections of the culm at nodes. Leave it in place. Now flip the ”arch” upside down, so what was formerly its ”underside” is exposed. The ends of the culm are elevated and its center touches down onto the work table. A second strip of masking tape straddling the ridge of this underside marks the second strip for a yumi lamination. Two more Japanese pull saw cuts follow the edges of the masking tape as before. After the second pair of cuts is done, the culm is easily deconstructed into the two yumi lamination strips, and two ”curvy” leftovers. These leftovers are easily band sawed into narrower strips about 1 cm wide for the yumi core.
The green, wet strips are passed through a spindle sander jig to produce a uniform width slightly greater than the width of the yumi limb at the grip. The inside surface is sanded flat to obtain a rougth approximation to a yumi lamination. The immediate processing of green culms into rough yumi laminations has these advantages: (i) It prevents splitting: As an intact culm dries, circumferential stresses which induce lengthwise splitting arise. Due to their much smaller cross section dimensions, the initial rough yumi laminations have much smaller internal stresses. They dry without splitting. (ii) Air drying is much faster: Due to all the cutting and sanding, the pithy, moisture-laden layers beneath the hard outer surface of the culm are much more exposed. Moisture content reaches a dry equilibrium in a few weeks.
The cross sections of laminations cut from old growth are stable during rapid drying. Laminations cut from young growth, not so much. As the soft and moist inner layer contracts relative to the hard outer layer during drying, the cross section buckles as depicted in Fig. 6.
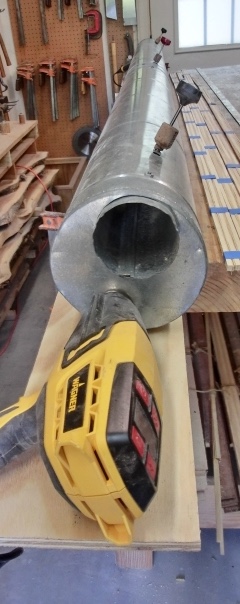
The air dried rough laminations undergo a final heat treatment before refined sanding. Figure 7 shows the ”oven.” Two sections of 6” diameter sheet metal stove pipe are joined to achieve a total length of 9′. Inner 3” diameter pipes are fastened inside the walls of the outer pipes. When the two outer pipes are joined, there is a gap between the two inner pipes. Heat guns placed at both ends drive streams of heated air towards this gap and they come out through the inner pipes. This design is adaptation of an oven developed for tempering bamboo fly fishing rods. A 250o to 300o temperature is established and maintained for a half hour. This is a bit below the requirements for real tempering. Nevertheless it drives out waxes and oils through the hard outer layers of the strips. The heat treatment alters the cross section of a strip as depicted in Fig. 8.

Fine shaping and pairing of bamboo laminations
Fine sanding begins by refining the uniform width of the bamboo laminations. The uniform width of all laminations, including the core, facilitates the potentially tricky layup with glue. Next, the glaze of oils and waxes on the outer surfaces is cleaned away with fine steel wool doused in acetone. The outer bamboo surfaces are covered with blue masking tape which remains in place until the laminated yumi is cured. The inside surfaces of the laminations which became convex after heat treatment are sanded flat by a pass through the spindle sander. Due to the irregular geometry of the convex outer surface with its nodal bumps, there is no fence for this pass through the spindle sander. It is done by hand, eye and feel.
After the first pass, the maximum thickness of the cross section is measured with a digital caliper at a sequence of positions along the length, half way between adjacent nodes. The measurements are written down on the blue masking tape with a white out pen at the locations where they are taken. Corrective sanding follows, until all measured thicknesses are within 10% of a uniform value. For Don Symanski yumi I’ve examined, 0.150” is a typical thickness. A belly lamination pried off an old Japanese take-yumi is 0.200” thick. My laminations tend to be thinner, between 0.100” and 0.125” thick. The dense, hard outer layer of the bamboo which provides most of the strength is about 2 mm ≈ 0.080” thick. Material near the inner surface of a culm is much spongier and weaker than this hard outer layer.
Mating of back and belly pairs is straightforward if we use the two laminations that come from a single culm. Any node of a belly lamination should be nearly half way between adjacent back nodes. Hence one lamination is displaced by half of a nodal spacing relative to the other. The laminations are oriented so that as we ascend the yumi from bottom to top, we ascend the culm in the direction it grew. The nodal spacing increases significantly as we ascend a bamboo culm, so the staggering of belly and back nodes relative to each other is approximate.
Belly laminations under the strike plates
Looking closely at the second panel of Fig. 1, you can see that the belly lamination continues under the strike plates. This innovation was introduced by Don Symanski. In this construction, there is no vertical joint where the belly lamination ends and the strike plate begins, as you will see in older, more traditional constructions. Such a vertical joint is an obvious place of weakness.
One question: How do you join the strike plate with the convex surface of the bamboo? You don’t. Figure 9 depicts an end segment of the belly bamboo sanded flat, and feathering to zero depth where the end of the strike plate will be.

The yumi cross section and tapering
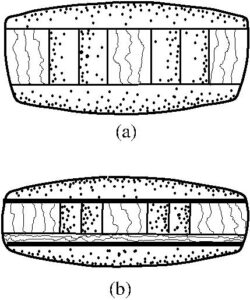
Figure 10a depicts the cross section of a traditional take-yumi based on an illustration from the book “Kyudo: The Essense and Practice of Japanese Archery,” by Hideharu Onuma, with Dan and Jackie De Prospero. The side and middle strips of the core are hardwood. There are four bamboo strips, two on either side of the middle hardwood strip.
Figure 10b is a schematic cross section typical of my work. Some details: The hardwood strips are Hickory, whose strength and elasticity metrics are conspicuously greater than most domestic hardwoods. The growth rings are aligned close to vertical. The bamboo strips are thinner than traditional, so they consist mainly of the strong, dense fibers from the outer 2 mm layer of a culm. A thin Hickory lamination is included in addition to the traditional core. Its thickness is easily modified so that the overall limb thickness meets a design value, which in turn is related to the yumi strength. As mentioned before, the biggest departure from tradition is the inclusion of 10 mill = 0.010” or 14 mill = 0.014” unidirectional carbon laminations between back and belly bamboo and the core. These are indicated by the thick black horizontal line segments in Fig. 10b. Another departure from tradition is the overall shape of cross section. A traditional cross section is trapezoidal, with the back lamination wider than the belly. My cross sections are closer to rectangular. They are also thinner, relative to the cross section of a Take-yumi of similar strength.
The cross section is not uniform along the length of the yumi. The widths of Don Symanski yumi have modest tapering as we proceed from the grip to either tip, on the order of 10%. The thickness of a Don Symanski yumi also tapers, so the thickness at either tip is close to 3/4 the thickness at the grip. The bamboo skins have close to uniform thickness, so the thickness tapering is mainly in the core.
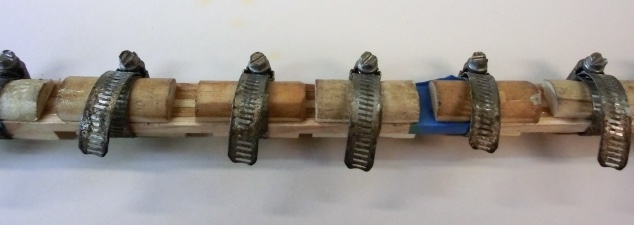
The preparation of hardwood and bamboo strips for the core with their rectangular cross sections is straightforward. The surfaces of the strips that join in glue lines are coated with EA 40 smooth-on epoxy. The proportion of resin to hardener is two to one by weight. The main innovation is the layup, depicted in Fig. 11. The half cylinders come from 1” dowels cut lengthwise in half. Polyethylene is glued to their flat surfaces which contact the core. The half cylinders press the core from above and below when band clamps which wrap around them are tightened. The width of the core should exceed the 1” width of half cylinders and the aluminum strip so the band clamps press the core from the sides as well. After the clamps are secured, the clamped core is inserted into the long oven depicted in Fig. 7. The two heat guns with their lowest fan and heat settings easily maintain a curing temperature of 130 o for six hours. Finally, the cured cores are passed through a spindle sander jig to create an initially uniform thickness with clean, flat surfaces.
Later, when we laminate the Urazori shape of the yumi, the band clamp system really comes into its own. The surfaces of half cylinders which contact the back and belly laminations are cambered to match their convexity. The band clamp system easily accommodates the curves of the Urazori shape.
How is core tapering actually carried out in the shop? Since my cores tend to be thin relative to typical take-yumi, large and powerful machines such as thickness planers are risky. The thin tapers used in western bow limbs are shaped by belt sander jigs. The slow but highly controlled sanding process allows you to achieve thicknesses less than half a millimeter. In my shop, I have ”reference tapers.” These are strips 4 cm wide and 1.5 m long, with thickness tapering rates of 0.002 mm/mm or 0.003 mm/mm. These can be tacked onto cores with rubber cement. The cores backed with tapers are run through a spindle sander jig, with the taper against the fence. Tapering above the grip uses the 0.002 mm/mm taper, and the tapering below uses 0.003 mm/mm.
Spline table lamination of the Urazori shape
As mentioned in the beginning, the shapes of yumi with carbon strips between back and belly bamboo laminations cannot be modified by heat aided bending, so the initial layup must achieve the correct Urazori shape at the outset. The “spline table” layup shown in Fig. 2 has more precision and control than the traditional ropes and splints process. Here, we explain the details.
The approximate reconstruction of a curve in the plane from a sampling of points along it is called interpolation. Here is how it was done in the era before digital computers: Heavy brass cylinders are laid on top of the graph, each “kissing” one of the sample points. An elastic strip, called a “spline” is threaded through the maze of cylinders. After some trial and error adjustment, the spline passes through all of the sample points, so defining a smooth curve that “interpolates” the sample points.
The “spline table” depicted in Fig. 2 has two inch diameter pine cylinders secured to an 8′ 1′′ × 12′′ pine board by 1/2′′ hex bolts. These are analogous to the brass cylinders placed on the scientist’s graph paper. The “spline” is in fact the uncured yumi threaded through the cylinders. The aforementioned trial and error adjustment is done with the dry stacked laminations (no glue). The cylinder placements are adjusted until the surface of the back bamboo closely follows the prescribed Urazori shape which is penciled on the table beforehand.
Figure 12 depicts the Urazori shape for a Nissun yumi to be traced on the spline table. The hollow dots mark curve endpoints, the solid dots, midpoints. The curve endpoints are labeled by their Cartesian coordinates in cm. The perpendicular displacements of midpoints from the chord lines connecting endpoints are indicated, also in cm. This shape is the embodiment of “broken mirror symmetry” as formulated in the article, “Aesthetics, Geometry and the Yumi.” Similar Urazori curves are constructed for the other yumi sizes, Namisun, Yonsun and Rokusun.

Figure 13 depicts the spline table with a yumi core serving as the spline. There are cylinders close to the curve endpoints and midpoints. The arrows give a qualitative sense of the forces upon the spline inposed by the cylinders. The dashed circle indicates a “missing” cylinder marking the left endpoint of the top curve. It isn’t needed, since the spline nicely interpolates this endpoint with no force required.

No-drama layup
A visual preview of the layup is shown in Fig. 2. Here, we fill in details. All surfaces of laminations which join in glue lines are coated with the EA 40 Smooth-on epoxy. As mentioned before, the proportion of resin to hardener is two to one by weight. There are simple common sense details. For instance, let’s say we have coated the joining surface of the belly bamboo. We lay it coated face up on the work table and place one of the carbon strips on it. We wet the exposed surface of the carbon strip, peel it off the belly bamboo and lay it back on with the coated face joining the coated bamboo surface. The partially coated carbon surface is now fully coated. Now lay the core on top of the carbon strip and wet the exposed surface. Again peel it off and lay it back on coated side down. As with the carbon strip before it, the partially coated core surface is now fully coated. It is clear how this process continues with subsequent laminations. The strike plates are joined to the assembly. The joining surfaces of the strike plates are not flat, but curve so the top and bottom yumi curves continue over the lengths of the essentially rigid strike plates. The completed stack of laminations is not stable due to ”lubrication” by uncured glue. The stack is loosely secured by masking tape wrappings or small zip ties.
Now comes the installation of the band clamps and half cylinders in a configuration similar to Fig. 11. The surfaces of the half cylinders are concave so they fit snugly on the convex bamboo surfaces. There is some common sense logistics. The band clamps are already closed, and we ”string” them along the proto-yumi like beads on a necklace. We concentrate them in appropriate bunches so they don’t get in the way when we thread the proto- yumi through the cylinders of the spline table. Now, one by one, we insert the half cylinders and lightly tighten the band clamp screws. In addition to the cylinders with the nominal 2” length, we have short extras, 1” or 1/2” long, to deal with irregularities like bamboo nodes, or proximity to a spline table cylinder. The panels of Fig. 2 labeled “top” and “bottom” show how the band clamp process is modified along the sections with the strike plates.
Now comes the installation of the band clamps and half cylinders in a configuration similar to Fig. 14. The surfaces of the half cylinders are concave so they fit snugly on the convex bamboo surfaces. There is some common sense logistics. The band clamps are already closed, and we ”string” them along the proto-yumi like beads on a necklace. We concentrate them in appropriate bunches so they don’t get in the way when we thread the proto- yumi through the cylinders of the spline table. Now, one by one, we insert the half cylinders and lightly tighten the band clamp screws. In addition to the cylinders with the nominal 2” length, we have short extras, 1” or 1/2” long, to deal with irregularities like bamboo nodes, or proximity to a spline table cylinder. We also need to adapt the band clamp process to the sections with the strike plates.
The Urazori shape is very close to a plane curve: 1/8″ spacers seperate the layup from the flat surface of the spline table. The final step of the layup is to tighten all the band clamp screws, sufficient to close all glue lines. For epoxy, the tightness need not be excessive. The layup process is detailed and fiddly. How long does it take? From mixing the epoxy to the final tightening of clamps, two hours. Well within the the working time of the EA – 40 Smooth on epoxy.
Figure 14 shows how the spline table is the floor of a ”curing oven.” The two heat guns at either end are set to a 280 o F temperature, which is low for them, and at the lowest fan setting. In the photograph to the right, the lid of the oven has been installed, along with three digital meat thermometers. The heat transfer is by air convection, and a steady oven temperature of 130 o F is soon achieved and maintained over a cure time of six hours.
Finish work
We pass the cured yumi lamination though a spindle sander jig to clean glue dribble from the sides and impose a uniform width along its entire length. We cut and shape the notches at the tips that hold the tsuru loops. We can brace the proto-yumi for a first look at its shape.
The 10% tapering of the yumi’s width from the grip to either end is carefully controlled: Paper strips glued to the belly bamboo serve as templates. The nominal 10% tapering may be modified by contingencies. For instance, if the the braced shape indicates too much stiffness in the upper limb, we may taper it a bit more than the nominal 10%. Tricks like this produce very modest shape changes, so the initial un-tapered shape should not be too far off.
Next we produce the traditional rounding of the yumi’s sides. Since the yumi lamination includes carbon which is extremely destructive to steel rasps, we use improvised rasps consisting of 50 grit belt sander strips glued to 18′′ by 2′′ wooden slats. The rounding of the sides with the belt sander rasps is somewhat tedious. Nevertheless some attention to detail is recommended. Sections of yumi near bamboo nodes are more resistant to abrasion. Careless rasp work can result in yumi with scalloped sides. I’ve seen it (not in Don Symanski yumi).
Finally, there is the truly tedious business of finish sanding as one eliminates all of the scratches due to the 50 grit sanding belt rasps. In particular, the first coat of lacquer or polyurethane over sanded surfaces tends to reveal hidden scratches and you go back to sanding.
Grip underlayment
Grip underlayment, nigiri, and rattan work are in the realm of routine maintenance, so we don’t dwell on them, save for one innovation: A traditional grip underlayment may be consist of paper layers stuck together with wheat paste or glue, or rubber strips with a rounded upper surface. Alternatively, one can saturate layers of leather in water-based wood glue and stack them to produce a thickness on the order of a quarter inch. The stack is taped to a PVC pipe with a 3′′ radius and allowed to cure. The cured stack fits nicely onto the convex surface of the belly bamboo. The cured stack is trimmed to proper length and width. Finally, it is sculpted with sanding drums of a Dremel tool to produce customized shapes upon request. The finished underlayment is secured to the yumi with contact cement.