Traditional aesthetics and material science
merge in the yamishi’s art

High end take-ya, made from single stalks of Yadake bamboo according to ancient traditions, are beautiful and compelling to many kyudoka. However, they tend to warp with changes in temperature and humidity, and their strong circumferential stresses may lead to lengthwise splits. In contrast, Ya made out of modern materials, such as aluminum and carbon, have very uniform properties and are minimally influenced by temperature and humidity. The laminated bamboo ya, whose fabrication is described here, combines uniformity and stability of ya made of modern materials with the aesthetics of traditional single stalk take-ya.

The excellence and vulnerabilities of take-ya

As explained above, ya made out of aluminum or carbon are convenient and practical, but many kyudoka appreciate the aesthetics of bamboo take-ya.  Bamboo take-ya do compare favorably with western archery arrows made from natural materials. For instance, my sensei, Aaron Blackwell, allowed me to examine and measure his Shinsa ya. They are 110  cm long and weigh 35 g.  Suppose we make a ya out of Port Orford cedar, a premium material for western archery arrows.  To achieve the same stiffness as the Shinsa ya, it must have a larger diameter and would weigh 50 g. This comparison points to the spectacular capabilities of bamboo.  We return to the vulnerabilities.

  • As a bamboo stalk dries out from the initially green state, strong circumferential stresses develop.  Most owners of traditional take-ya are very familiar with repairing lengthwise splits.
  • Even if the take-ya does not split, the stresses are still there, resulting in  warping with changes in temperature and humidity. 
  • The excellent craftsmanship of a traditional yamishi can produce a uniform cylindrical outer surface of the ya.  Inside, biology rules;  the interior void is generally not uniform between nodes.

Laminated bamboo ya

Perhaps we can take a hint from the yumishi:  With their thin bamboo back and belly laminations,  and cores with seven or more strips of bamboo and hardwood, taki-yumi are advanced far beyond single staves.  Why not  laminate ya from multiple bamboo strips?  Traditional fly fishing rod craftsmen do something like this.

Fig. 1: (a) Cross section of laminated fly fishing rod. (b) The laminations are truncated into trapezoids, resulting in a hollow rod. The arrows represent forces acting on the top strip, when we wrap a chord tightly around the rod. The arrow a and b act on the glue lines. Their vector sum a+b is illustrated in panel (c). The top of the strip is pressed by the opposite and equal force -(a+b).

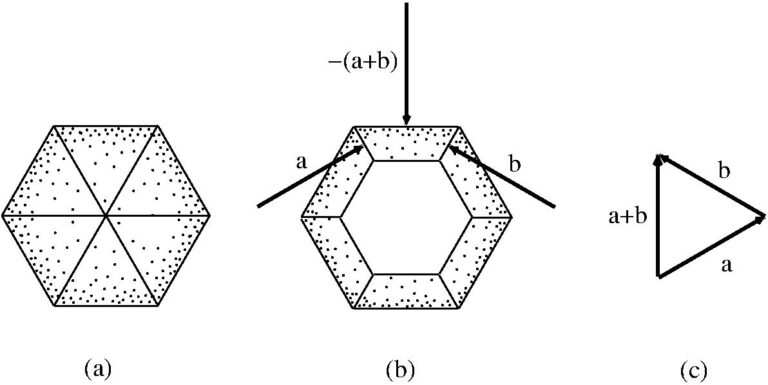
Figure 1a depicts the cross section of a laminated fly rod.  Most of the rod’s stiffness and strength come from the strong bamboo layers near the surface.   In Fig. 1b, we imagine cross sections of the individual strips truncated into trapezoids.  We would have a hollow rod with most of the stiffness and strength of the solid rod.   The trick is the layup.  As any woodshop person knows, uncured glue lubricates the contacts between joined pieces.  Controlling the proposed assembly looks like a nightmare. 

Simple physics comes to the rescue.  A yumishi might think to tightly wrap a chord around the outer surface in a helix.  That is what he does with yumi.  He would be in luck because the forces act in his favor.  An individual strip feels compression acting on the two glue lines.  These compressions by themselves tend to force the strip away from the center, but the tight wrapping of the chord around the perimeter prevents this.  The caption in Fig. 1 explains the balance of forces in a bit more detail.

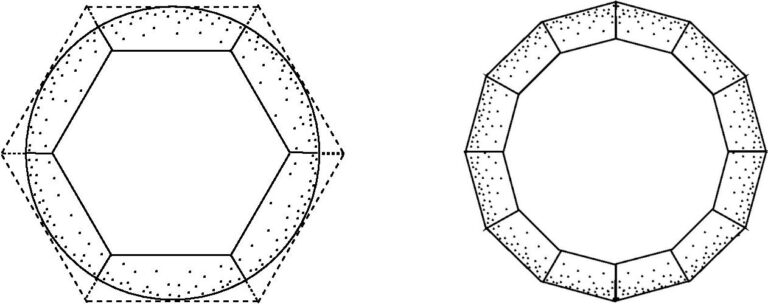
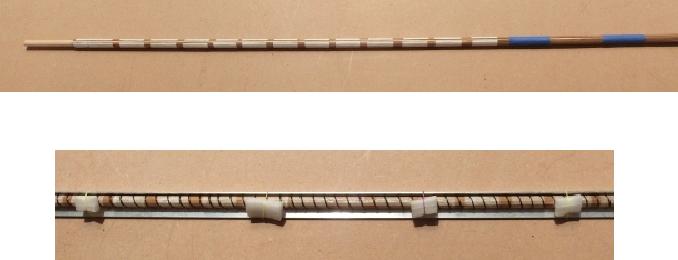
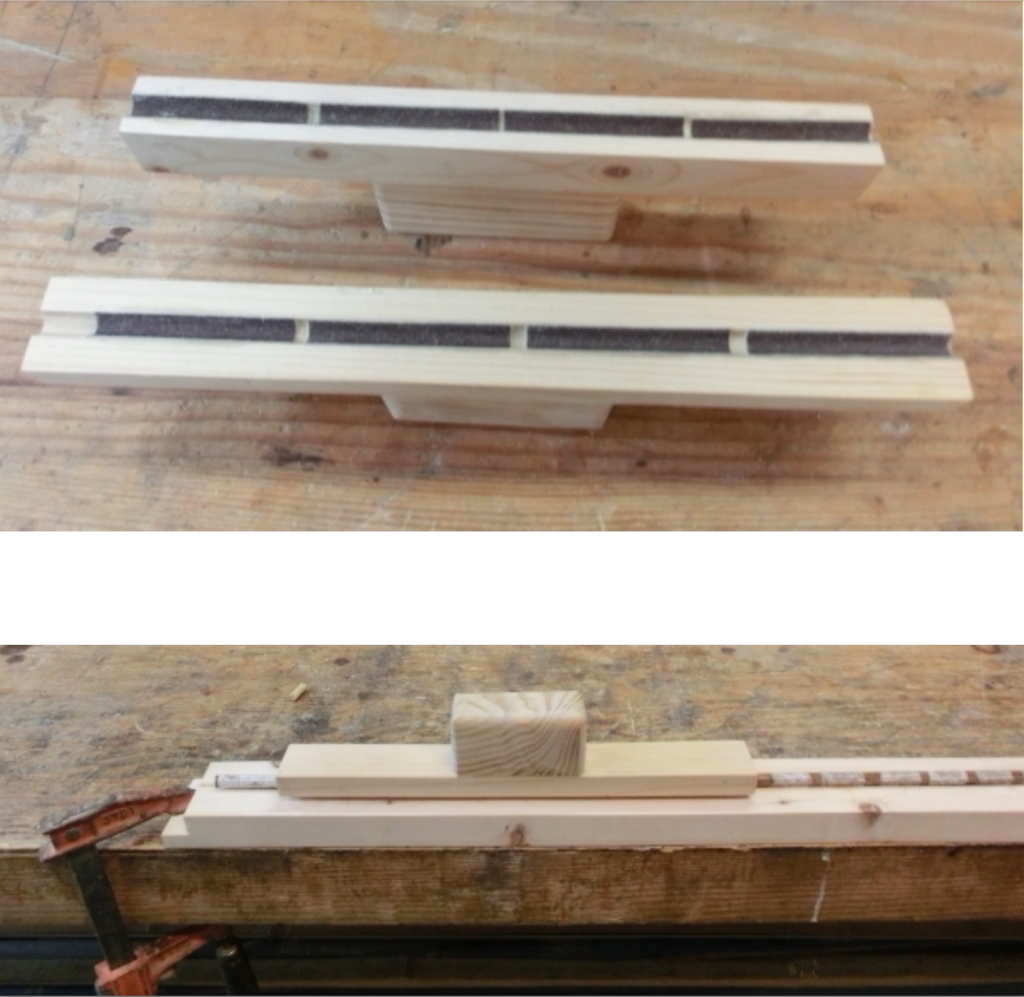
In practice, there are additional workshop tricks, such as how to start the assembly process. A process  emerges just by engaging and “thinking with your hands.” Starting from a cured hexagonal rod, the final cylindrical surface of the ya is produced by sanding away the vertices.  Left panel of Fig. 2 depicts the cross section of ya that results. If we have more strips, the polygon perimeter of the cross section before rounding is closer to a circle. Right panel of Fig. 2 depicts a cross section with twelve strips. 

Fig. 2: Cross sections of laminated bamboo ya. Left: Hexagonal laminated ya. Right: Twelve-sided laminated ya. It is much closer to a cylinder than the heaxagon.

Figure 3 depicts the trapezoidal cross section of one strip in the twelve strip lamination and a closeup of two adjacent strips joined together.  For a ya with an outer diameter of, say, 9.1 mm, the width of the strip is l ≈ 2.44 mm. A thickness close to τ ≈ 0.8 mm produces a ya whose weight is close to a traditional take-ya with the same outer diameter.  The geometry of the twelve strip cross section in Fig. 2 implies a 30o angle between the surfaces of two adjacent strips, as depicted in the  second panel of Fig. 3.  The 30o angle is achieved if the sides of a single strip have the 15o angles as in the first panel of Fig. 3.

Fig. 3: Left: The trapezoidal cross section of a single strip in the twelve sided lamination. Right: A closeup of two adjacent strips.
How do you make very thin bamboo strips?

How are we going to fabricate a twelve strip ya?  How are we to produce the thin and narrow strips?  A twelve strip layup secured by a chord wrapped in a helix is stabilized by the induced circumferential and radial forces much as in the hexagon case, but the stability is more delicate.  The process to be described emerges by common sense trial and error:  Just engage and “think with your hands.”

Though the strips can be processed from thin Yadake stalks,  large diameter stalks such as yumishi use are a better choice.  There are no leaf pockets, and the outer layer of the stalk with its high density of strong elastic fibers is close to 2 mm thick.  The basic tools are a band saw, spindle sander, and some improvised jigs attached to the spindle sander.   Though these are large, ordinary tools, we nevertheless achieve  the final tiny cross section of the strips in incremental steps. 

First, we band saw a large bamboo stalk into strips 2 cm wide and 130 cm long.  Ya are rarely longer than 110 cm.  The extra length allows for inevitable “boo-boos.”   Rough preliminary sanding flattens the raised nodal bumps on the outer surface of a strip.  The inner surface is flattened by passing it through the spindle sander jig depicted schematically in the Fig. 4a.   For the rough preliminary sanding, we use the  flat sanding belt with a coarse 60 grit.  Placing the strip flat surface down on the band saw table, we cut the wide strips into finer strips roughly half a centimeter wide.  These are passed through the spindle sander jig again.  As before, the outer surface contacts the fence, and the inside surface is sanded to achieve a thickness just over a millimeter.  Next, the outer surface is flattened by another pass as depicted in Fig. 4b.  We remove as little as possible of the strong fibers close to the outer surface.  More passes trim the widths of the strips down to 4 mm.  At this stage, we have a large collection of strips with rectangular cross sections close to 4 mm by 1 mm.

Fig. 4: Schematic of the jig for initial rough sanding. (a). Inner surface. (b) Outer surface.

For the remaining fine work, we replace the sanding belt by a 3″ drum with a fine 120 grit sleeve.   The motion of the drum is more precise than the belt.   We sand the inside surface of the strips to trim their thickness down to the design value of 0.8 mm.  To produce the final trapezoidal cross section of the strips, we employ the reconfigured jig depicted in Fig. 5.  The schematic cross sectional views show how it operates, and the photograph shows how it looks.  Admittedly, all this is crude.  Indeed, there is intial trial and error to get the width of the strips right.  Once set up, you should produce more strips than nominally needed for all the ya you want.  For instance, six ya require 72 strips, but I’d be inclined to make more than 80.  

Fig. 5: Cutting the angled sides of strips. The top panels show schematically how the trapezoidal cross section of the strips is produced. The bottom panel is the photograph of the jig as it really is.
How to lay up the bamboo strips

The layup of the twelve strip lamination begins by constructing a “raft” of the strips:  It is convenient to lay up the strips around a dowel as shown in the top photograph of Fig. 6. Initially, they are lightly secured by low tack masking tape. The masking tape strips don’t hold up when epoxy is applied, so they are replaced by paper strips attached to the bamboo strips by yellow wood glue. The paper strips don’t close the cylindrical raft, so we can pry it open and spread low viscosity epoxy on the inner surface. The low viscosity reduces excess glue accumulations outside of the actual glue lines between strips. The “clamping” is achieved by wrapping a chord tightly around the outer surface of the cylinder.  The dowel that served as a mandrel to form the raft is removed in increments as the winding of the chord proceeds.  The initial layup with uncured glue lines is malleable like a wire due to slippage along the glue lines.  After a rough preliminary straightening by hand, the layup is secured for curing to a straight L-beam as shown in the second photograph of Fig. 6.

Fig. 6: Layup of the twelve strip lamination. In the top photograph, the blue strips are the low tack masking tape. The white strips, paper secured with glue. The bottom photograph shows the layup wrapped by securing thread, and lightly clamped to a straight aluminum L-bracket.

The final cylindrical surface of the ya is producing by improvised “planing.”  The first photograph of Fig. 7 shows two of the “planes.”  Each consists of a strip of coarse sanding belt secured to a semi cylindrical channel cut in a pine board with a router.  The second photograph shows the ya sitting in a slot of a long pine board as the “plane” is passed over it.

Fig. 7: "Planing" the ya surface into a cylinder. The top photograph shows the "planes." There are about four of them with different diameters. The bottom photograph shows how the planes are used.

Figure 8 shows a remnant of the final hollow cylinder left over from cutting the ya to length

Fig. 8: A section of the laminated cylinder.

Comparison between laminated ya and take-ya

Figure 9 depicts the fletched end of a finished ya.  Its specifications are:  length 11 cm, diameter 9.1 mm, weight 32.1 g.  The weight compares favorably with the 35 g weight of the Shinsa ya mentioned at the beginning of this article.  Its stiffness is 7% greater.

As explained on the page “Ya Selection in Kyudo,” kyudoka with the longest yazuka (depth of draw) shooting the strongest yumi might be better served by ya much stiffer than standard take-ya.  The laminated bamboo ya described here have stiffnesses close to traditional take-ya.   The page “Ya Selection in Kyudo” documents tests of a ya whose stiffness is greatly increased by wrapping bamboo strips around a carbon tube. The carbon tube has an outer diameter of 8 mm and wall thickness of 0.5 mm; the bamboo strips wrapped around it are 0.3 mm thick. Such a ya looks almost the same as the pure bamboo ya depicted in Fig. 9, but is twice as stiff.

Fig. 9: The fletched end of a laminated bamboo ya produced by the process described on this page.
Scroll to Top